Showing posts with label fall decorating. Show all posts

Saturday, September 7, 2013

A Fun Fall Fair

Well, I"ve been busy!
Next weekend (September 14-15)
 is the Campbell Valley Fair and I've been making things to sell in my booth.
Like what, you ask?
Well, there will be pumpkins.
Painted fabric pumpkins,
 pumpkins with faces, 
 little pumpkins with faces,
 burlap pumpkins,
 painted, flat pumpkins,
 wool pumpkins, 
 pumpkins on sticks,
and in garlands,
 scarecrow pumpkins,
 pumpkins with crows,
 and crows on pumpkins.
Of course there'll be food...
 I can never grow these gourds with the long necks
so I decided to sew a few. 
 You can't have a fall fair without sunflowers,
 or a few cats,
and some crows,
 and a few more pumpkins.
Halloween's just around the corner
so we need a few scary things.
 How about a burlap owl or two? 
 Or a fat chenille spider and little spider-web coasters?
 This oh-so-creepy bat?
 Or some of these?
Did I say there'd be pumpkins?
And lots of other fun stuff!
Hope to see you there!

Sunday, September 1, 2013

Suddenly, it's fall

Where did summer go?
 The grapes are ripe on the vines along our back porch.
 And I feel like creating a little fall project.
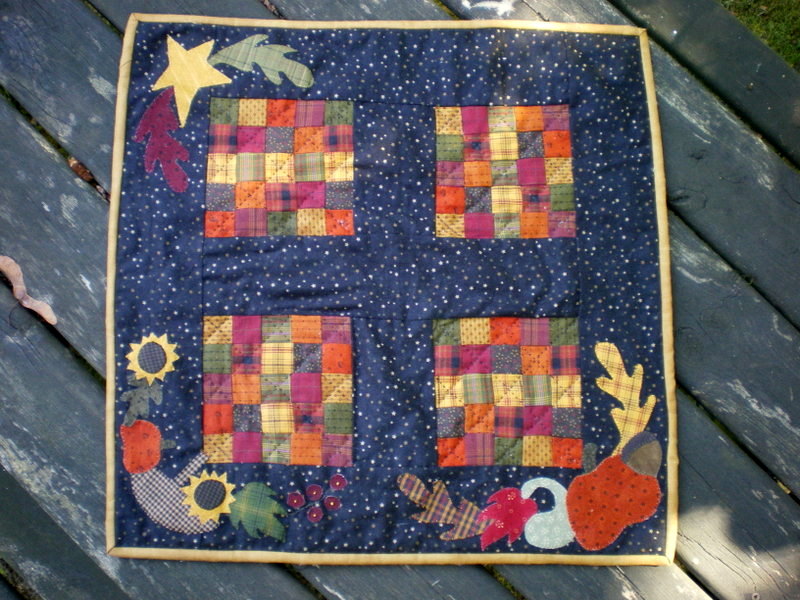
So I choose my favourite colours and make four of these 5" scrappy squares.
 Surround them with some star print fabric and add some fusible applique in one of the corners,
 And a second corner,
 And a third.
 Add the binding and voila!
A little mat for my fall table.
Happy fall everyone!

Thursday, October 25, 2012

What Shall I Make Today? Creepy Cobweb Coasters!

Here's a last-minute Halloween decorating idea for you!
Draw lines like this on a piece of graph paper.
My finished design will be 4 1/2" square so the cross-lines are at 2 1/4".
Make little marks at 3/4" down and across from each corner.
Draw an arc between the lines on the top half of the diagram, like this:
Fold the paper in half and cut out along the arcs.
Unfold the paper and pin to a double layer of muslin, with a piece of batting underneath.
Make sure to leave about 1/2" around the shape.
Sew around the shape, leaving one arc open.
Remove the piece from the machine and cut out 1/4" outside the stitching.
Cut straight across the points.

Turn the piece right side out through the opening.
Use a chopstick or other pointy thing to get into the points.
Hand-stitch the opening closed.
Place the piece between 2 single layers of cheesecloth.
Machine-stitch with contrasting thread across the shape from point to point,
making sure to intersect in the center.
After you've stitched the 4 lines across the piece,
move your needle about 1/2" toward the center.
Following the arcs, stitch around the shape.
When you get back to the beginning,
move your needle another 1/2" toward the center
and stitch again around the shape, following the arcs.
Repeat once more and remove from the machine.
Trim any long threads and the cheesecloth loosely around the shape.
If you like, you can brush some stiffener onto both sides of the shape and let dry.
Your creepy cobweb coasters are finished!
If you want, you can loop a length of thread through a point and hang them around your house.
Happy Halloween everyone!

Wednesday, September 26, 2012

What Shall I Make Today? Burlap Pumpkins!

Sometimes I want to take a break from quilting and just make stuff to decorate my home or sell at craft markets. Here's an idea I came up with for fall--burlap pumpkins!
First, find a plate or something with the diameter you want--mine was 8" across. 
Place it on a double layer of burlap and trace around it with a pencil.
Cut out the circles 1/4" outside of the traced line.

Sew all the way around the circle on the traced line.
Separate the two circles and cut a small "x" in the center of one of them.
Turn the circles right side out through the opening.
Stuff with polyfil.
Cut a length of twine, thread it through your largest needle, and knot the end.
Push it through the opening to the other side.
When it comes through the center of the other side, pull the twine around the circles and reinsert it into the opening.
Pull it around the opposite side.
Turn the circle one-quarter of the way around and pull the twine around and through the bottom center.
When you come to the end of the twine, knot it off and bring the end into the center of the pumpkin.

Keep going until you've divided the circles into 8 sections.
This is what it should look like when you're done this part.
Find a stick about 1" in diameter and cut off a 2" long piece.
Put a bit of hot glue on one end.
Press the glued end of the stick down into the opening of the pumpkin.
Squirt some more hot glue around the stick onto the pumpkin opening.
Press some Spanish moss onto the glue to cover the opening.
Enjoy your burlap pumpkins!


Happy fall, y'all!