Sometimes I want to take a break from quilting and just make stuff to decorate my home or sell at craft markets. Here's an idea I came up with for fall--burlap pumpkins!
First, find a plate or something with the diameter you want--mine was 8" across.
Place it on a double layer of burlap and trace around it with a pencil.
Cut out the circles 1/4" outside of the traced line.
Sew all the way around the circle on the traced line.
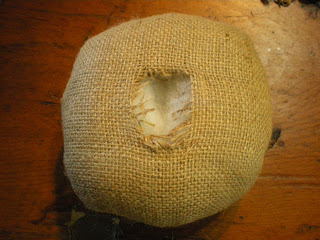
Separate the two circles and cut a small "x" in the center of one of them.
Turn the circles right side out through the opening.
Stuff with polyfil.
Cut a length of twine, thread it through your largest needle, and knot the end.
Push it through the opening to the other side.
When it comes through the center of the other side, pull the twine around the circles and reinsert it into the opening.
Pull it around the opposite side.
Turn the circle one-quarter of the way around and pull the twine around and through the bottom center.
When you come to the end of the twine, knot it off and bring the end into the center of the pumpkin.
Keep going until you've divided the circles into 8 sections.
This is what it should look like when you're done this part.
Find a stick about 1" in diameter and cut off a 2" long piece.
Put a bit of hot glue on one end.
Press the glued end of the stick down into the opening of the pumpkin.
Squirt some more hot glue around the stick onto the pumpkin opening.
Press some Spanish moss onto the glue to cover the opening.
Enjoy your burlap pumpkins!
Happy fall, y'all!


.jpg)


I love that and you made is so simple to follow and do. I will have to try some, I have a bit of extra burlap from old projects.
ReplyDeleteDebbie
Wow!!! they are so coll & so easy!
ReplyDeletetoo cute!!!!!!!!!!!
ReplyDeleteBeautiful! And looks easy enough to make! Thanks!
ReplyDeleteThose are really cute! They look much easier than the twine one I made over the weekend.
ReplyDeleteThanks for the tut.. cute as can be. This I think I will try.
ReplyDeleteThey are so adorable! I'm off to try my hand at making some. Thanks for the tutorial!
ReplyDeleteBlessings
So cute!!! Love the idea!
ReplyDeleteThose look great! What a quick and easy decorating idea - thanks for sharing!
ReplyDeleteCharming! (that seems to be my word for the day. lol) But love your pumpkin idea!
ReplyDeletereally cute pumpkins.
ReplyDeleteThese are just too cute. Thank you.
ReplyDeleteJackie
Hi it's me cucki from south Africa..your new follower:)
ReplyDeleteI love the pumkin so much ..I wil surely make them soon.
Love from Africa
Big hugs cucki xxx
I love these pumpkins!! They really are so cute!! Great work as always :)
ReplyDelete