Sunday, February 19, 2012

Another Spring Chick

Here's another quick and easy idea to add a bit of spring to your home.
Make a few of these little egg-shaped chicks,
hot-glue one to the center of an old jar lid,
and stuff some spanish moss in around it!
You can download the chick pattern at Patternmart.
Thanks for looking and have a great day!

Monday, February 13, 2012

Free Pattern - Spring Chick Table Mat

The sun is shining, my bulbs are starting to poke their leaves through the soil, and it's starting to feel a lot like spring.  Hurray! (I hate winter, can you tell?)
So I thought I'd share a little table mat you can make to celebrate the promise of new life that spring brings.
All you need to make this is two 8" squares of green felt, a 6" square of light yellow felt, and a scrap of gold felt.  (I used National Nonwoven's Reet's Relish, Native Maize, and Butternut Squash.)  Plus embroidery floss to match (I used DMC 676, 730, 782, and black) and some freezer paper.
Trace the following template onto graph paper and then onto the dull side of the freezer paper.
Iron the freezer paper onto the felt and cut out 2 mat shapes and 6 chick and beak shapes.  Whip stitch the beaks onto the chicks with 1 strand of matching floss.  Use 2 strands of black floss to make French knots for the eyes.  Pin the chicks onto one of the mat shapes and whip stitch each into place with 1 strand of matching floss.  Pin the 2 mat shapes together and blanket stitch around the outside edge with 2 strands of matching floss.
Voila!  How simple was that?
Happy spring everyone!

Wednesday, January 25, 2012

New Patterns to Download!

Over the years some of my patterns have been published in different quilt magazines.  In case you missed them, I've added them to my inventory for you to purchase.  Here they are:
This first pattern measures 40" square.  It's called "Starry Glow" and was published in McCall's Quick Quilts in 2004.  It even made the cover!!!
The second quilt is called "Maple Leaf Weave".  It measures 51" square and was also published in McCall's Quick Quilts, in 2003.
And this one is called "Everything's Coming Up Roses".  It was published in The Canadian Quilter in 2006 and measures 38" x 38".
All of these patterns are available for instant download at these links: Patternmart and Patternspot.
I'll also be adding them to the New Patterns page of my website this week.

Saturday, January 14, 2012

Valentine Gift Bag Tutorial

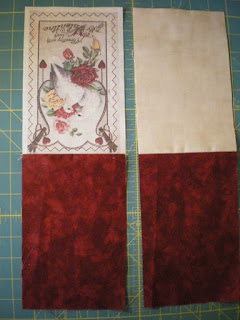
Here's a quick project you can whip up in time for Valentine's Day.  First, find an image you want to print onto some muslin.  I found this one at The Graphics Fairy .  There are lots of tutorials online to show you how to print pictures onto fabric, such as this one here. Print your picture onto a piece of muslin.
Trim away the excess fabric, 1/4" from the picture.
Cut out a piece of backing fabric and 2 pieces of lining fabric, the same size as the piece of fabric with the picture.  Right sides together and with a 1/4" seam, sew the lining pieces to the top of the picture piece and the backing piece.
Press the seams in opposite directions and "butt" them together, with the right sides of the fabric pieces on the inside.
If you want, you can add some batting to the bag, to give it a bit of weight.  Cut 2 pieces of cotton batt 1/4" shorter than the other pieces, so they line up with the seam and pin on the top and underneath the backing and picture pieces.
Starting at the short end of the lining pieces, sew a 1/4" seam around the entire piece, ending your stitching a couple of inches from where you started so that you have an opening for turning.  Clip all corners.
Pull the bag through the opening (I use a pointy chopstick to get into all the corners).  Hand-stitch the opening closed and push the lining back into the bag.
Poke a little hole near the top of the side seams and insert a length of rusty wire.  Twist the ends to secure.
Fill the bag with gifts for your sweetie--chocolates, a candle, dried flowers, whatever.
Happy Valentine's Day everyone!

And thanks to all of you for your words of comfort, following my previous blog.  They were all so very much appreciated.